Ramp Diagrams
Here are diagrams from typical drive-in installations. Grading the field in this manner permits a clear, unobstructed view of the screen from cars parked anywhere on the lot. This was the basis for the original drive-in theatre patent: a series of ramps arranged in a semi-circle around the screen, each succeeding ramp a little higher than the one in front of it. This way, patrons can see over the top of the cars in front of them.
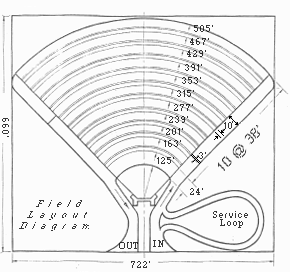
Typical field dimensions.
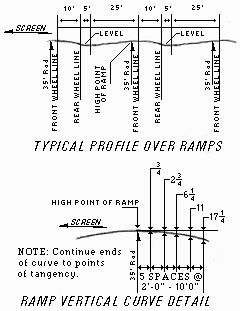
WHY ARE RAMPS NECESSARY?
The purpose of the ramps are to allow drivers to align the fronts of
their cars vertically
with the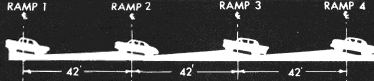 screen. As the car is advanced
onto the ramp,
the screen will come into view. The angle is adjusted by forward or
back movement of the
car on the ramp, so that both front and rear seat occupants can enjoy a
clear view of the
screen through the windshield.
screen. As the car is advanced
onto the ramp,
the screen will come into view. The angle is adjusted by forward or
back movement of the
car on the ramp, so that both front and rear seat occupants can enjoy a
clear view of the
screen through the windshield.
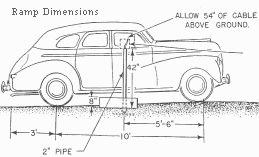
Ramp dimensions from typical installations. Proper grading and
overall ramp design is
critical to the successful operation of a drive-in.
Of course, individual site topography dictates the actual grading cuts and/or fills, and a complete land survey is required for new installations. Regrading is also necessary for theatres that erected additional screens about the existing field. There actually are theatres that have added a second screen at the rear of the lot and are parking cars backward to view it! This is inexcuseable. Needless to say, these installations have the capacity for 75% more business on these screens, if they would only regrade their lots.

An illustration of how ramp dimensioning, grading, and screen
height, combine to create
unobstructed sightlines through every windshield in the theatre. The
dashed line indicates
the property's original grade and reveals cuts and fills for this
section.
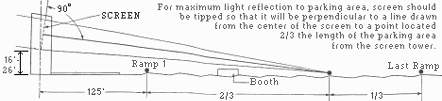
Proper aiming of the screen is diagrammed and formulated in this
drawing. This
procedure delivers maximum reflected light to the parking area.
Otherwise, much of the
screen image light would be wasted to the night sky.